Join Course
Contents |
Overview
DIKSHA offers a wide range of courses. After you log in, you can join the course on your own, or your organization may invite you to join the course. The course categories are:
-
My courses: This category displays the list of courses that you have undertaken, have partially completed or recently joined. This list also includes the courses that you have been invited to join. You can view your enrolled courses based on enrolment date and locate your courses easily.
-
My State’s courses: This category displays the list of State-specific courses that are created and uploaded by the user’s State. This list is visible only to users registered in that specific State. If you log in as an authenticated State user, you can join the course for any batch that is open for enrolment. The list displays the most recently created course at the top.
-
Featured courses: This category displays all available courses, irrespective of the organization that created it. Any logged-in user can join the course shown in this category.
-
Latest courses: This category displays a list of the courses most recently added to DIKSHA.
The guidelines to take the courses vary for each course. The creator or mentor decides the guidelines applicable for that specific course.
| Step | Screen |
|---|---|
| 1. You are logged in
2. You have clicked on the Courses tab | 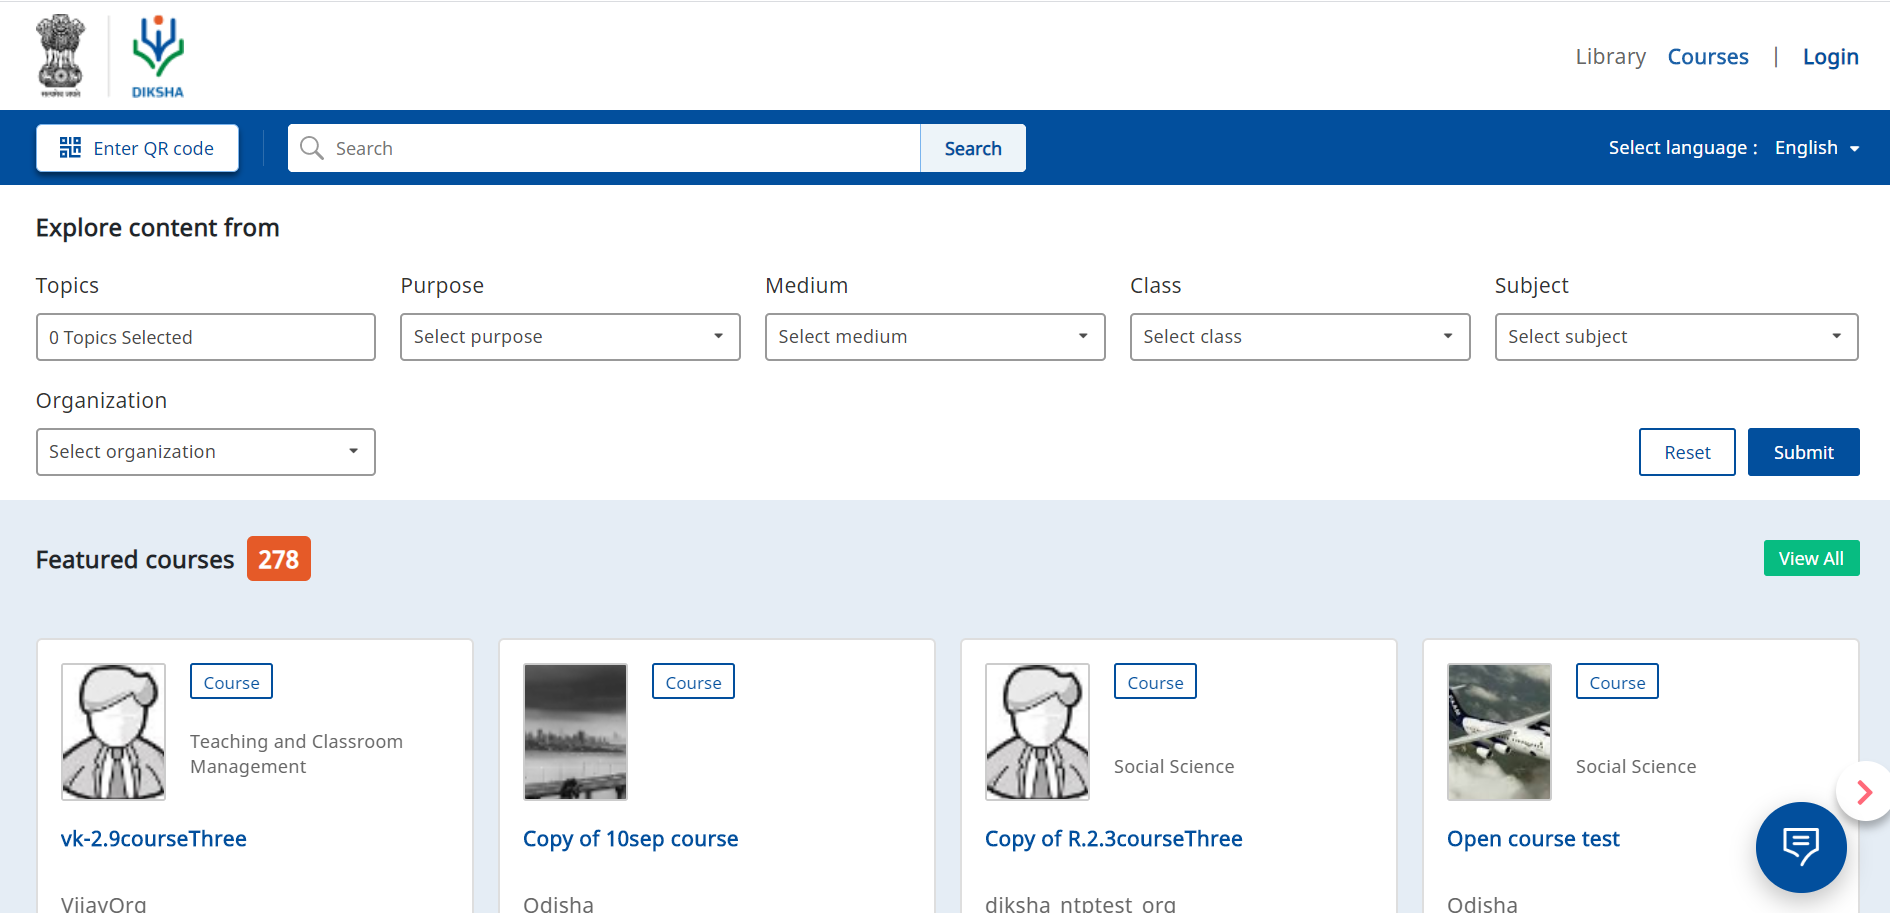
|
Joining a Course
Before starting the chosen course, the user needs to agree to the terms and policies of DIKSHA. The ‘Continue’ button on the pop-up is enabled only after the user checks the box. The user cannot exit the pop-up without agreeing.
| Image with instructions |
|---|

|
Registered users can join any available batch of a course. The available batch dates are displayed for all courses. Messages are displayed for the following batch status:
- If the enrolment date has been crossed
- For batches whose enrolment isn’t open yet
When the user joins a batch, the duration within which the batch will expire is displayed below the batch name and is updated until the batch ends.
| Step | Screen |
|---|---|
| Select a course from My State's courses, Latest courses or Featured courses sections. The course details page is displayed
1. Click Join to join the course Note: A user can voluntarily join or leave an open course | 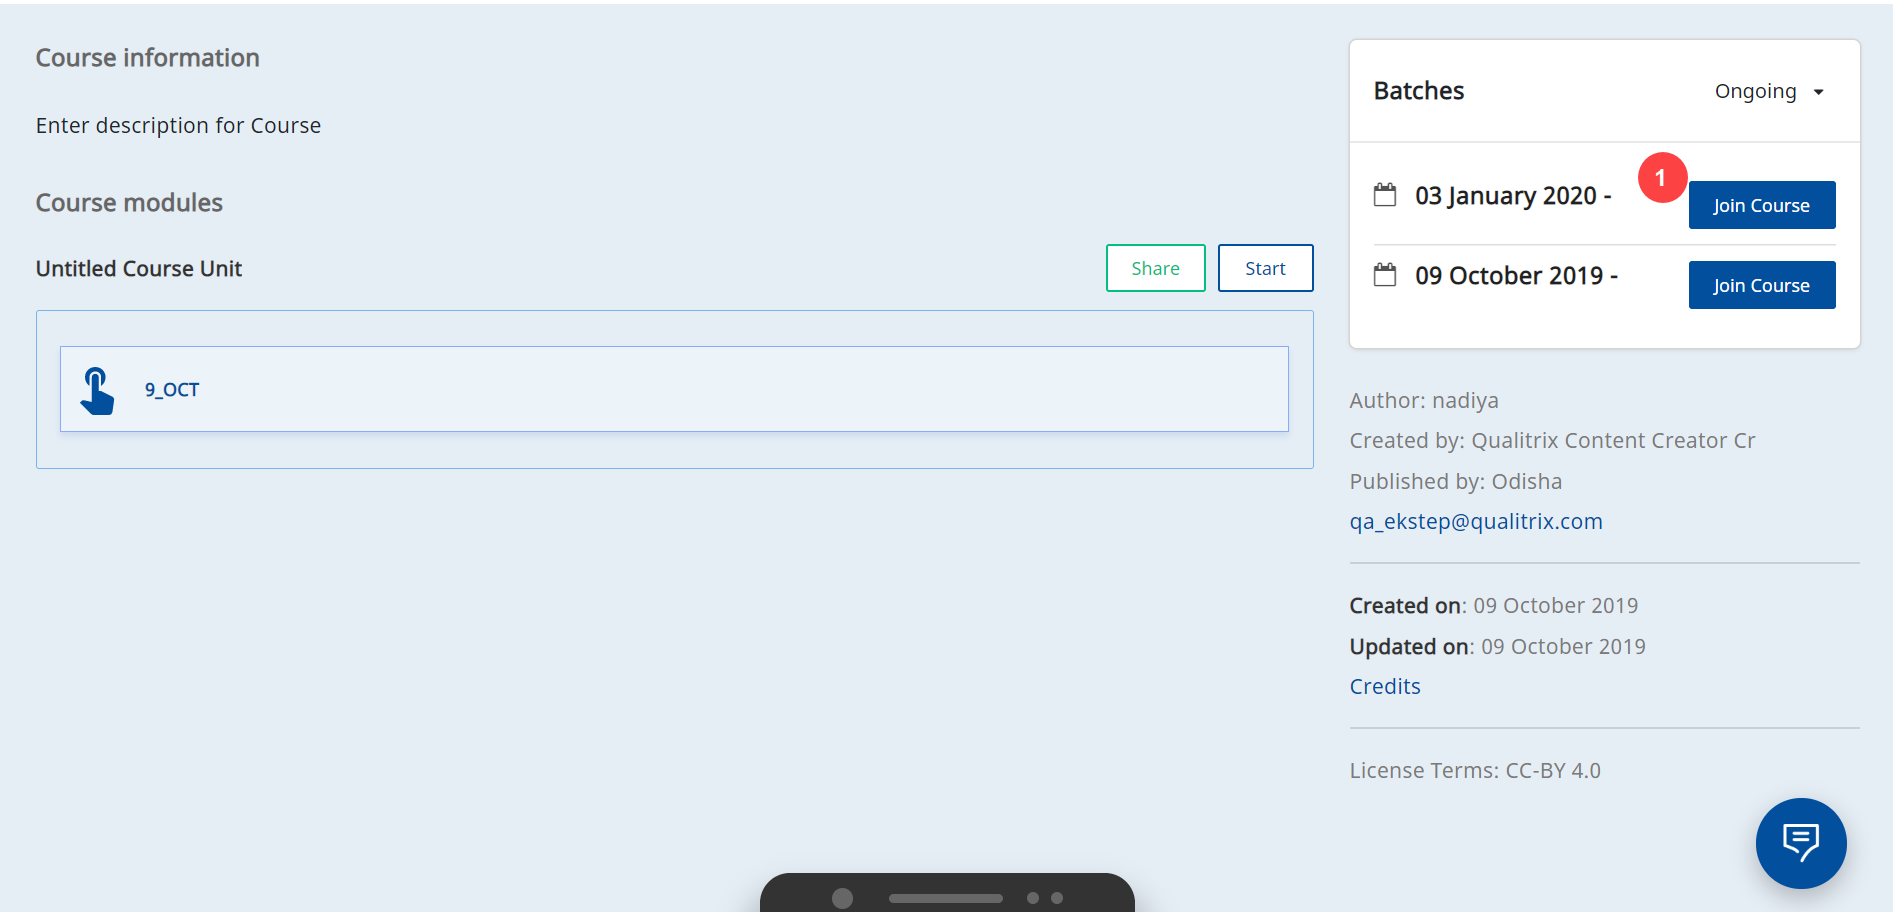
|
| 1. Click Join course on the course pop-up screen
2. Click X icon to go back to the previous screen. When you enrol for a course, you have the option to share or not share your profile data with the course administrator. For details refer Share Profile Details | 
|
| Click Join course, a pop-up is displayed. The name given in your profile is present on the certificate, you can make the required changes on this pop-up to edit your name | 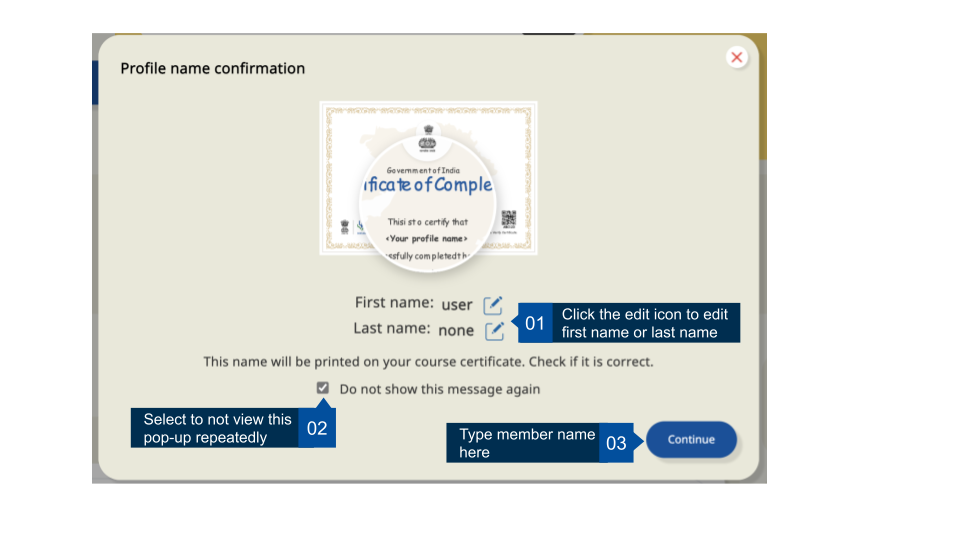
|
| The following details about the course are displayed:
1. Name of the course 2. Rating assigned to the course 3. Click the Share icon to share the course link. Alternatively, you can also share each module within the course individually 4. Description about the course 5. Click Folder icon or (v) icon, to view the content of the course under the Course Structure section. The table of contents of the course is displayed here Note: Signed in users can view the content covered within each unit of a course, through a table of contents | 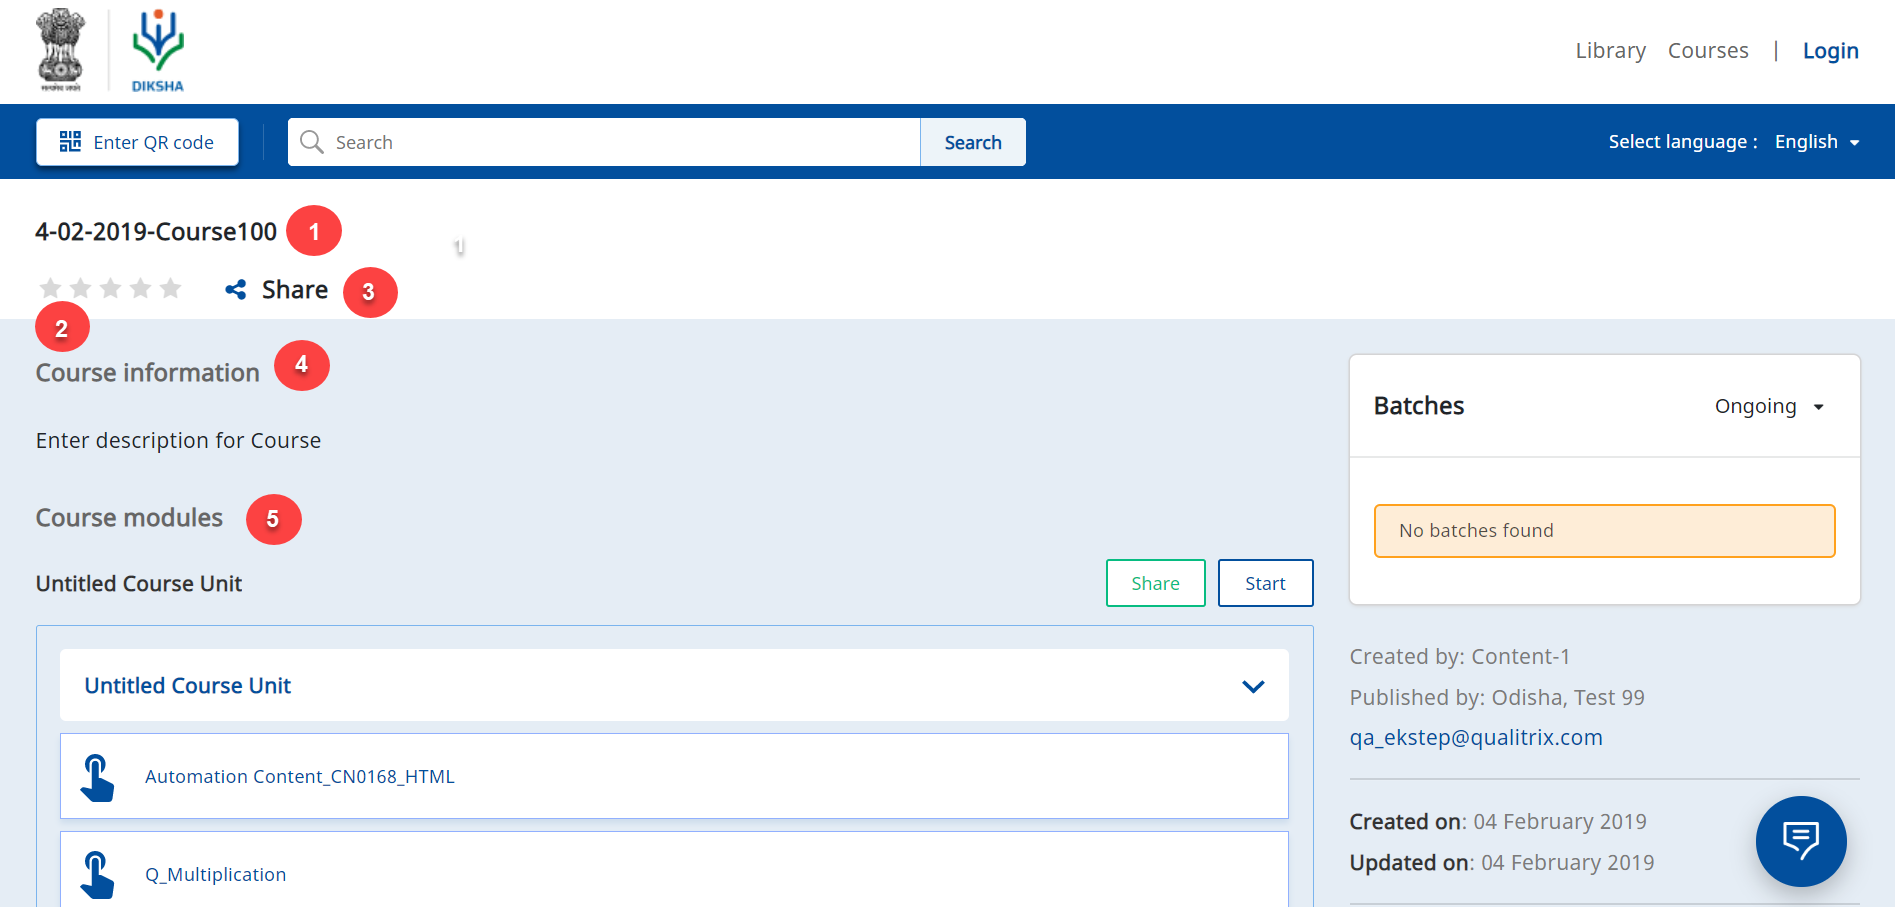
|
|
1. Click Continue Learning to revisit the section of the course you last visited. To know more, refer Resuming a course 2. Details of when the course was last updated is displayed here 3. This section indicates if there is a certificate associated with the course 4. View the upcoming and ongoing batch details in Batch details section 5. The progress of the user is captured and displayed here Note: When the course ends the course progress bar is greyed out in the Courses Card and Course TOC page. To know more, refer Accessing a Course after Batch Expiry 6. Click Credits & license info to view all attribution details | 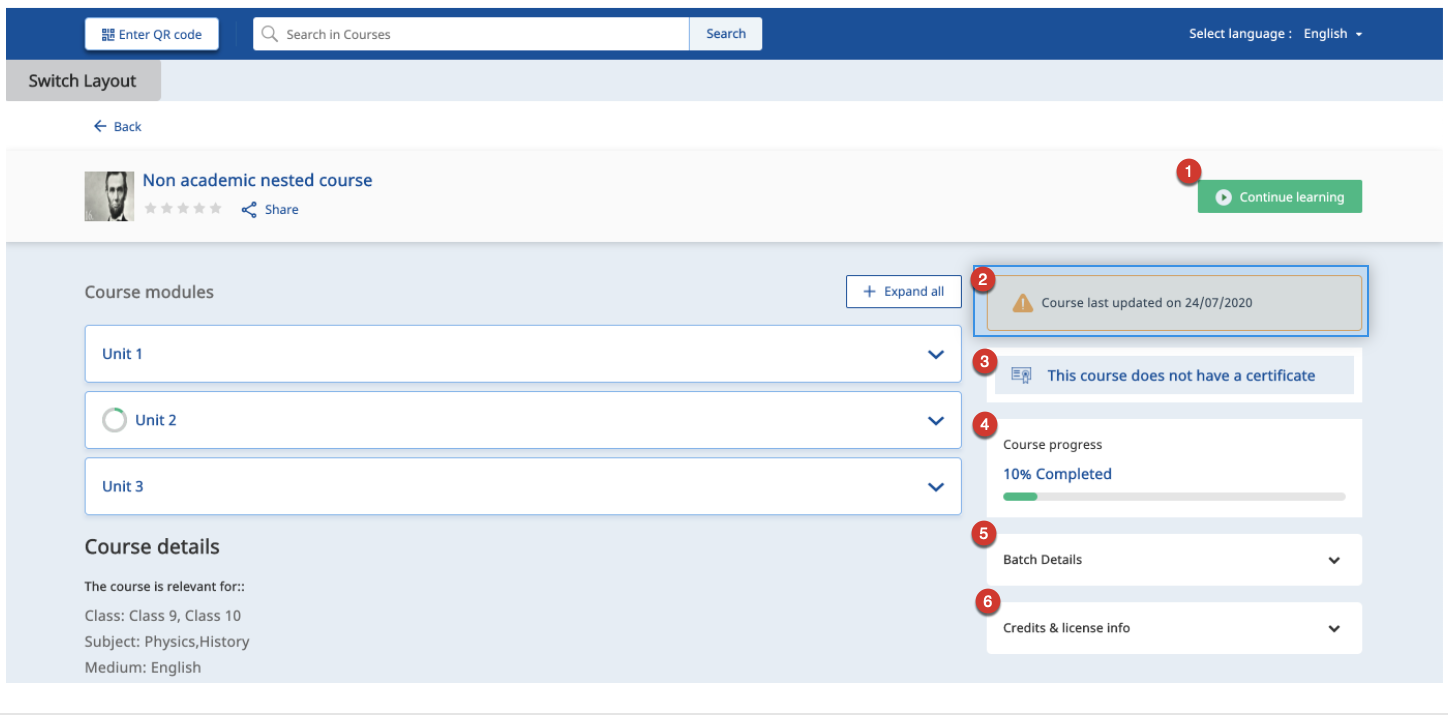
|
Completing a Course
On DIKSHA, there are two types of courses, those with certificates and those with no certificates. A note is displayed on the course details page to indicate if the course has a certificate. On successfully completing a course, a course completion message is displayed. For courses with certificates, details of the certificate are also mentioned. For details on downloading course certificate refer Course Certificates
Courses can also have assessments. Completing the assessments are sometimes determiners to indicate the completion of a course. Course mentors can add assessments at the end of the course or for each module of the course. There can be one or many attempts to take the assessment. Each time a user attempts the assessment a message is displayed to notify the remaining attempts for the user. Once the user crosses the permissible attempts, they cannot retake the assessment. Additionally, when the user initiates an assessment, a timer indicates and warns the user for the remaining time before the assessment is automatically submitted.
Some courses are also available within the Digital Textbook section. These course do not have a certificate associated with them and you cannot track the progress of these courses, but you can take them and complete them akin to the courses available in the Courses section.
Inbuilt Content Player
Click the course material link to display the course content in the inbuilt content player
| Step | Screen |
|---|---|
| 1. Click Menu to view the player options available
2. Click left scroll icon to go to previous page or slide of course content 3. Click right scroll icon to go to the next page or slide of course content 4. Click Previous, to view study material preceding the current material in the course content list 5. Click Next to view study material immediately subsequent to current material from the course material list 6. Click Take Note to make any notes on the current course material 7. Click Resume course to continue from where you had stopped earlier 8. Click X icon to exit the course. In case you click on the close icon before the course is completed, you can still resume the course. For details refer Resuming a course | 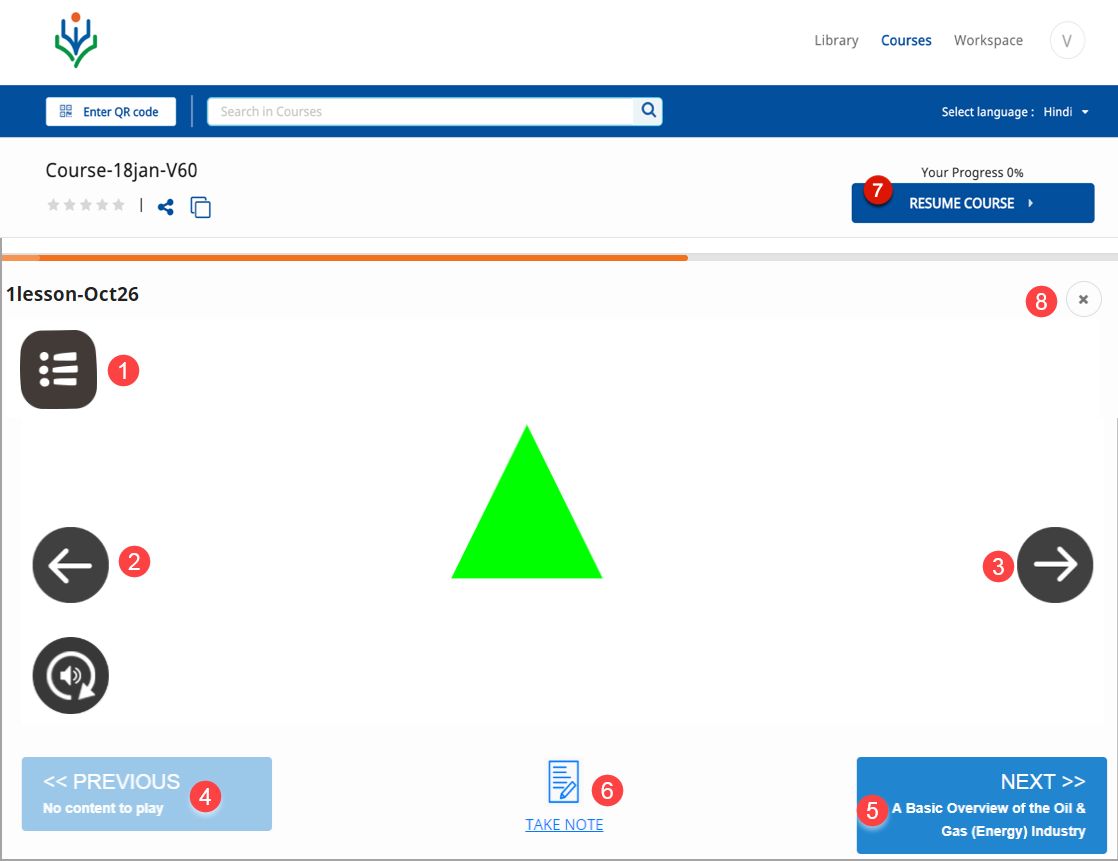
|
Content Player Menu
Click the course player menu in the content player to display the name of the course
| Step | Screen |
|---|---|
| 1. Click Replay to replay the study material 2. Click Sound on to turn on or off sound for audio or video study material 3. Click Teacher’s Note to view teacher’s notes for the current course material 4. Click Home to navigate to the Homepage | 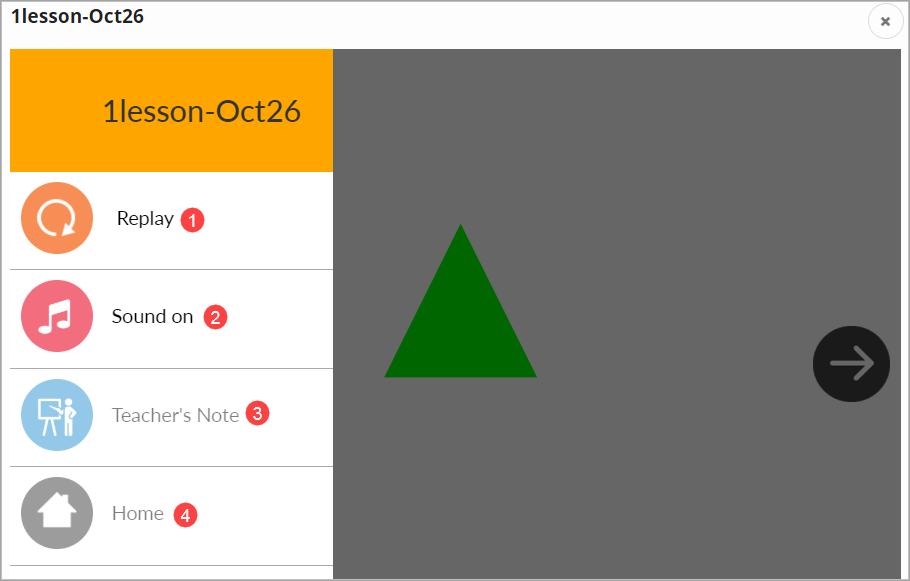
|
Taking Notes
You can maintain separate notes for each course that you take.
| Step | Screen |
|---|---|
| Click Take a Note option to take notes
1. Enter an appropriate Title for your note, such that you can easily identify and retrieve the note 2. Enter Details of the note 3. The toolbar comprises of various text formatting options 4. Click Clear, to delete and rewrite your notes. On clicking clear, the title is also cleared 5. Click Save to save the changes | 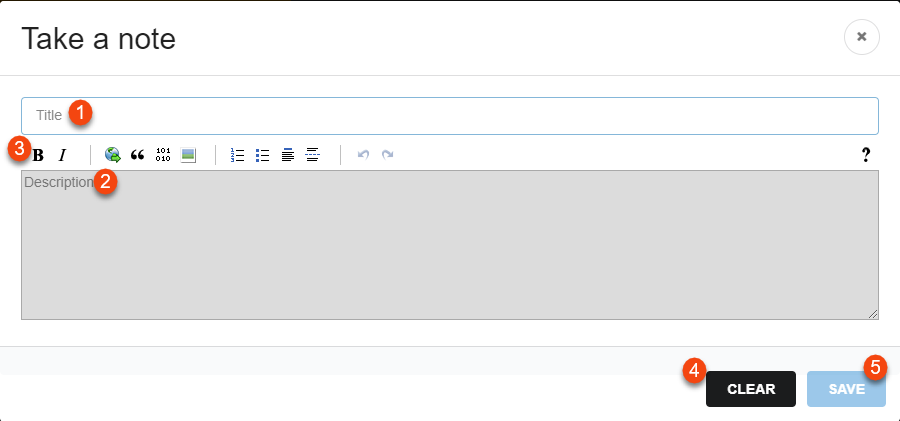
|
Resuming a Course
When you close your current course, deliberately or accidentally, even before you complete the course, you can resume and continue it. To resume the course, ensure that the course batch has not expired. You can open the course from the My Courses section.
| Step | Screen |
|---|---|
| 1. Click Continue Learning to revisit the section of the course you last visited
or 2. Click on the topic/unit from the table of content to directly view the section of the course | 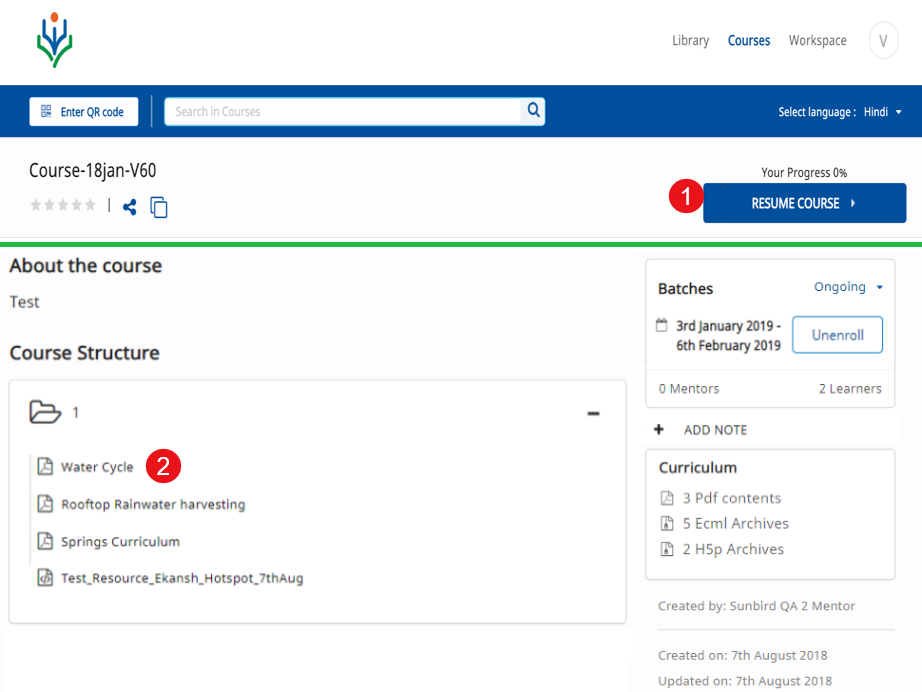
|
Accessing a Course after Batch Expiry
When a user opens the course for which the batch has expired:
| Step | Screen |
|---|---|
| An alert message appears "This course has ended and your progress is locked. However, you may continue using the remaining content”
The user can proceed with the course, however the user's progress of the course completion will not be captured. | 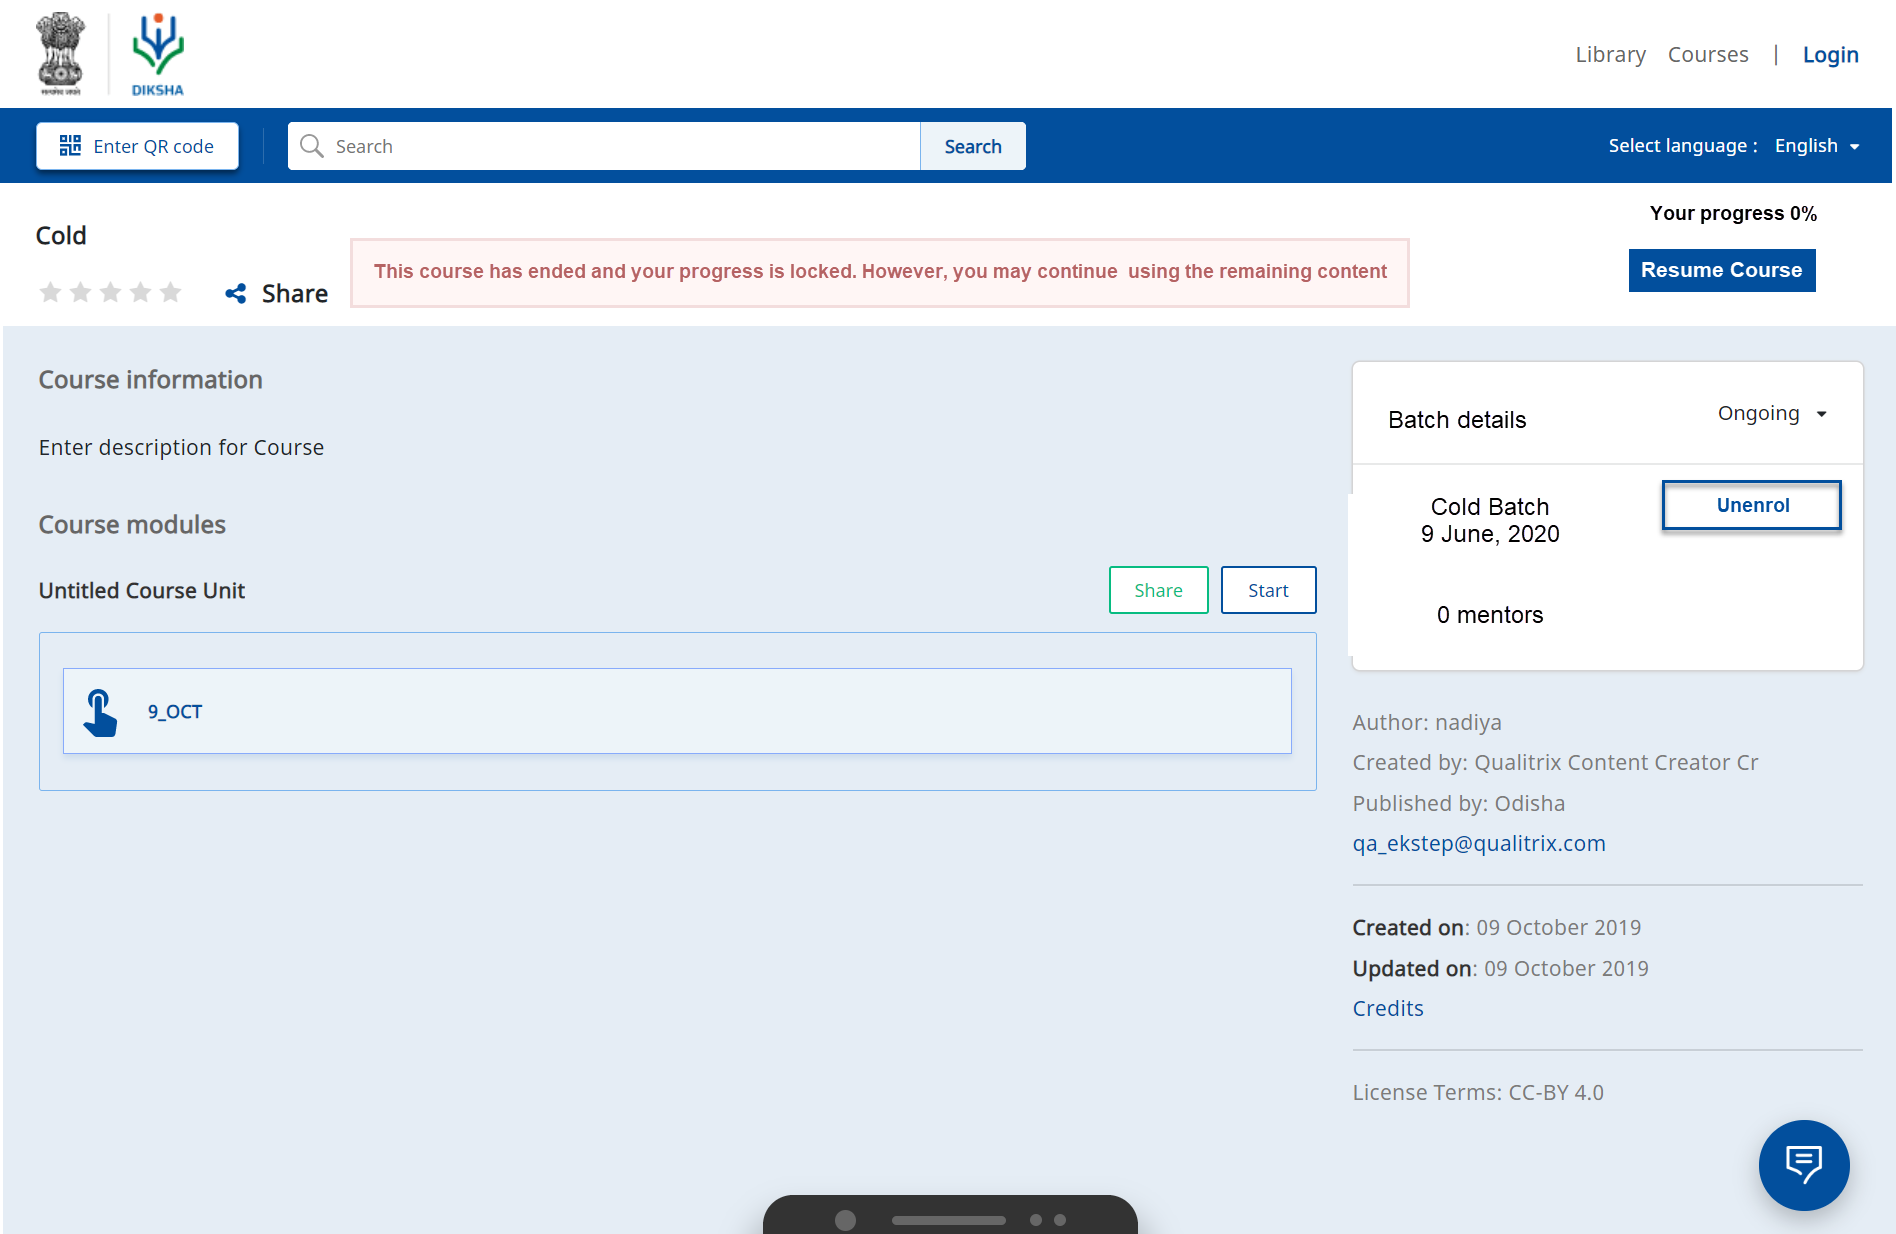
|
| Multiple Batches
Consider a scenario: you have joined in a batch and that batch has expired. To continue with the course, you must join another batch of the course. To find any upcoming or ongoing batch of the course, use the search and filter option on the Courses tab. 1. Click Resume to continue with the course in an expired batch. Note: The progress for this batch will not be captured 2. Click Enrol to register for an ongoing or upcoming batch Note: The cumulative progress is captured when you proceed with the batch | 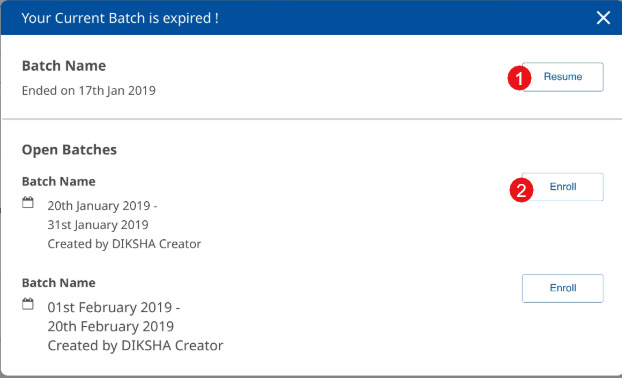
|
| Once you join the ongoing or upcoming batch for the course, the course card appears under My courses tab. There are individual course card for each batch.
1. Search for the course name using search bar 2. Browse and select the course with ongoing batch under My Courses tab 3. Click to open and proceed with the course 4. This progress bar represents an incomplete and expired course 5. This progress bar represents a current course Note: The user can resume a course in an ongoing batch, provided the enrolment end of the date has not been crossed. Also, they can resume the course from the section they conducted just before the batch expired. It captures the cumulative progress of the two courses. | 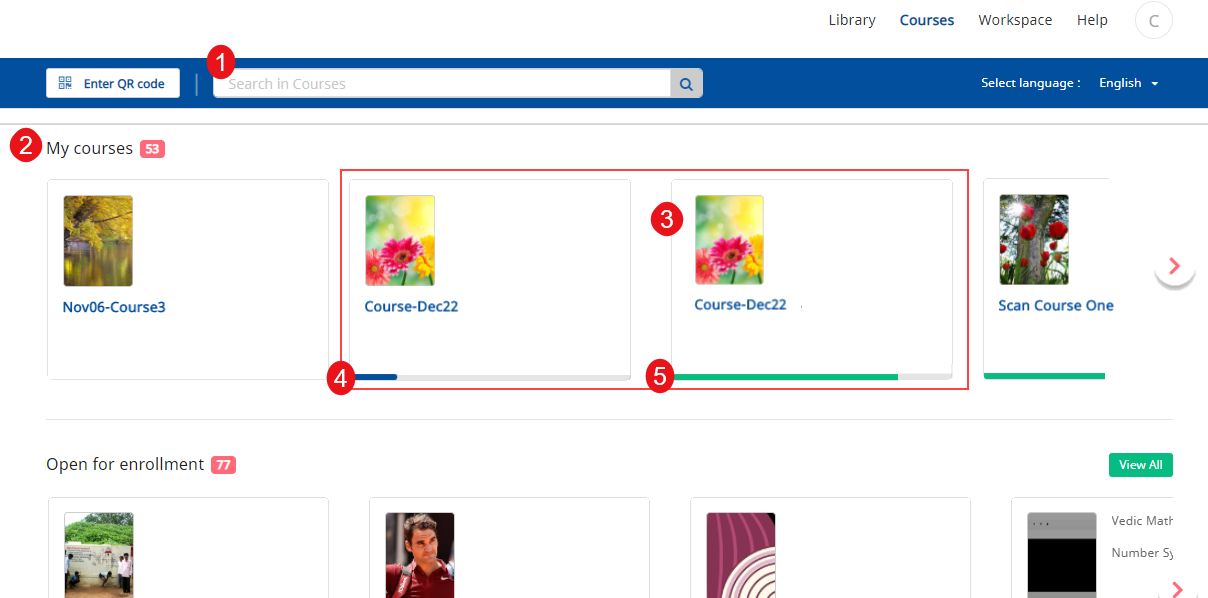
|
Leaving a Course
| Step | Screen |
|---|---|
| Search for the course by entering the course name in search bar. The course is displayed as a search result
1. Select a course from the My courses section 2. Tap the course to open the course details page Note: Each time a course is updated, the details of the update are displayed | 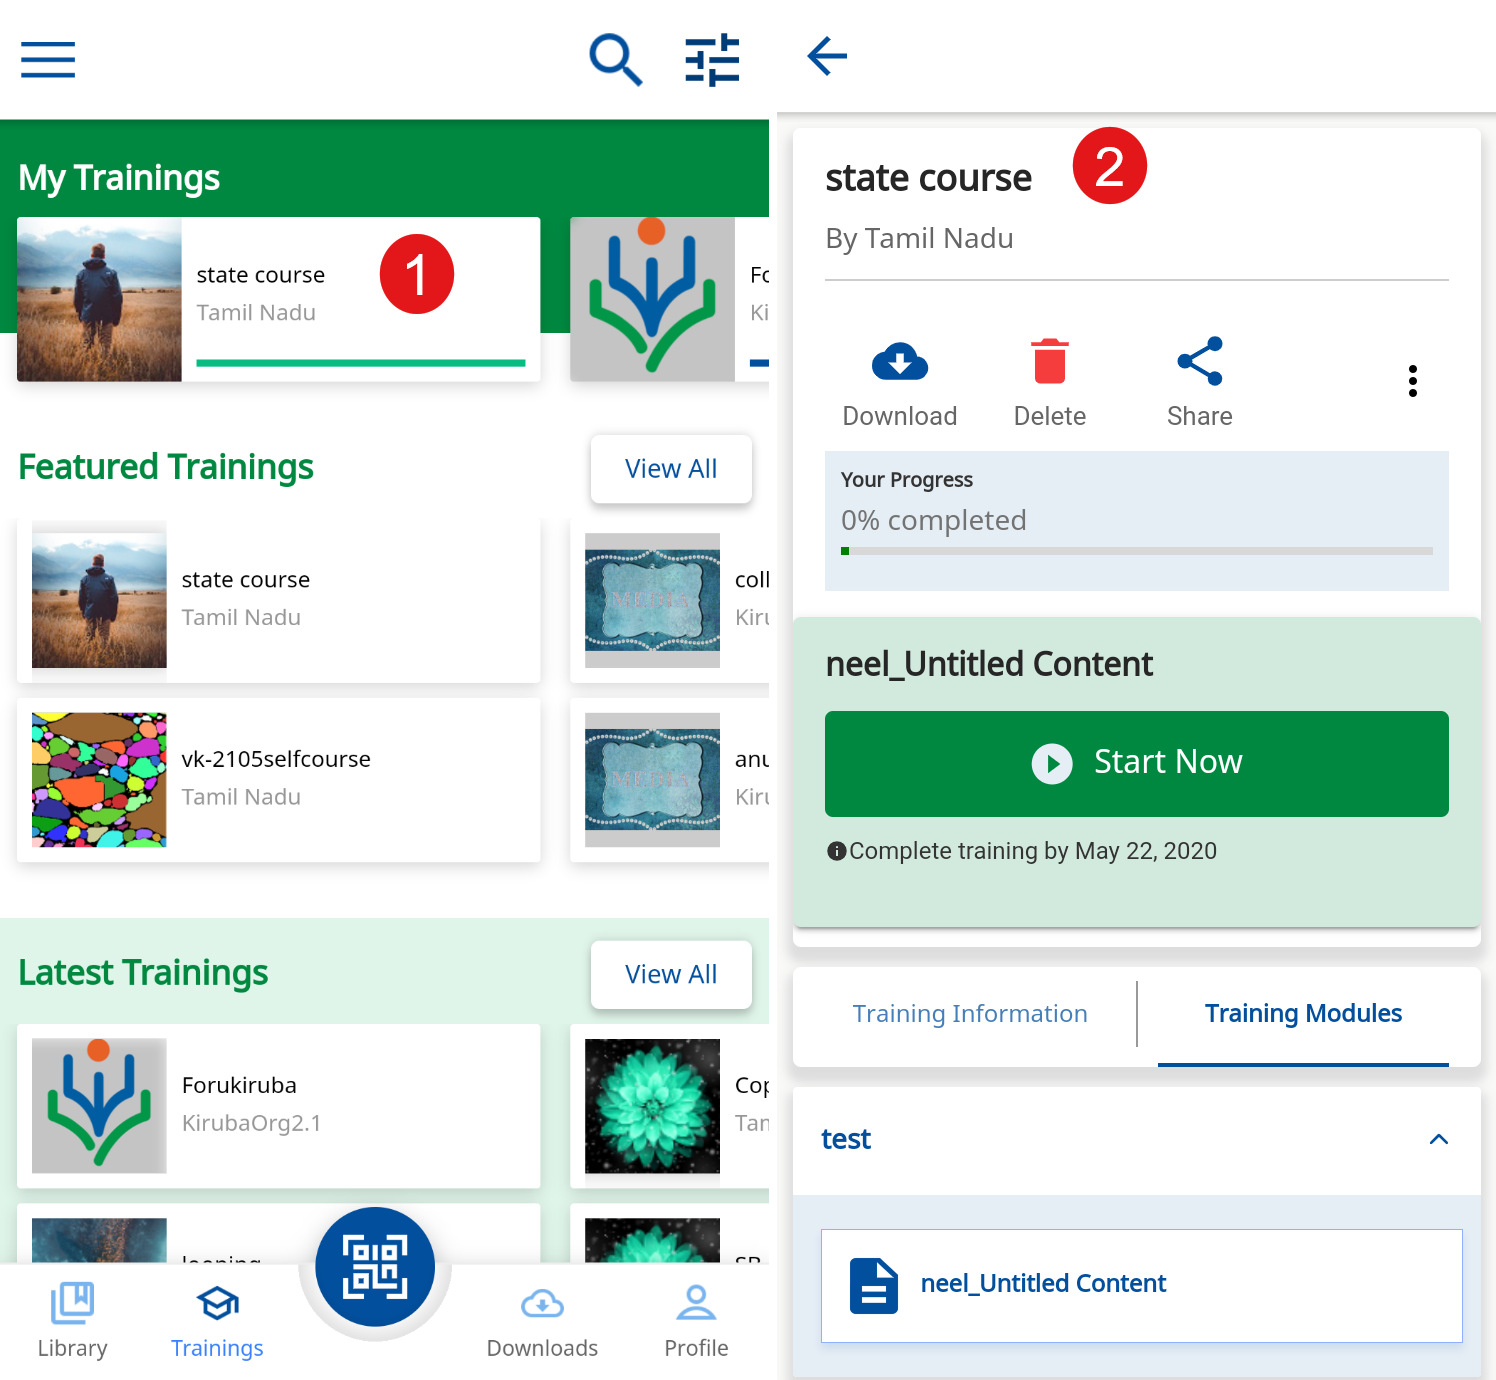
|
|
1. Tap the burger menu icon
2. Tap Leave Course 3. The Leave course pop-up box is displayed 4. Tap Confirm to leave the course 5. Tap Cancel | 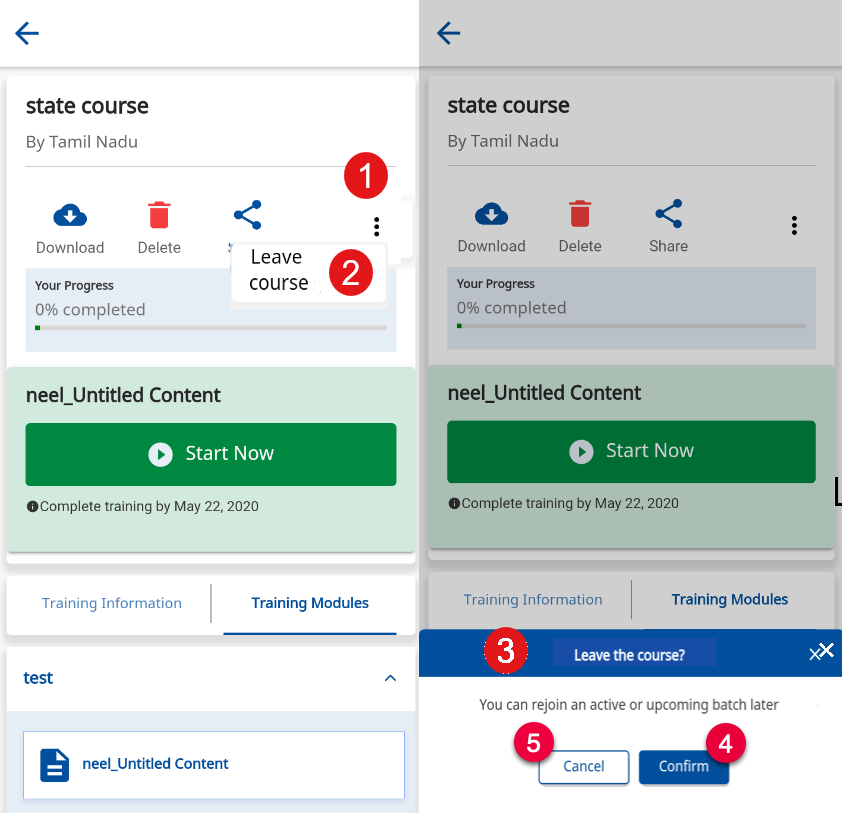
|
- is selected from the Open for enrolment section
- is not completed
- batch has not expired
| Step | Screen |
|---|---|
| 1. Click Leave course to leave and withdraw from the course. A prompt window is displayed
2. Click Leave course. On successfully leaving the course, a confirmation message is displayed Note: Once a user leaves a course, the Leave course button is disabled. The user will receive an email notification on leaving the course 3. Click Cancel to go back to the previous screen | 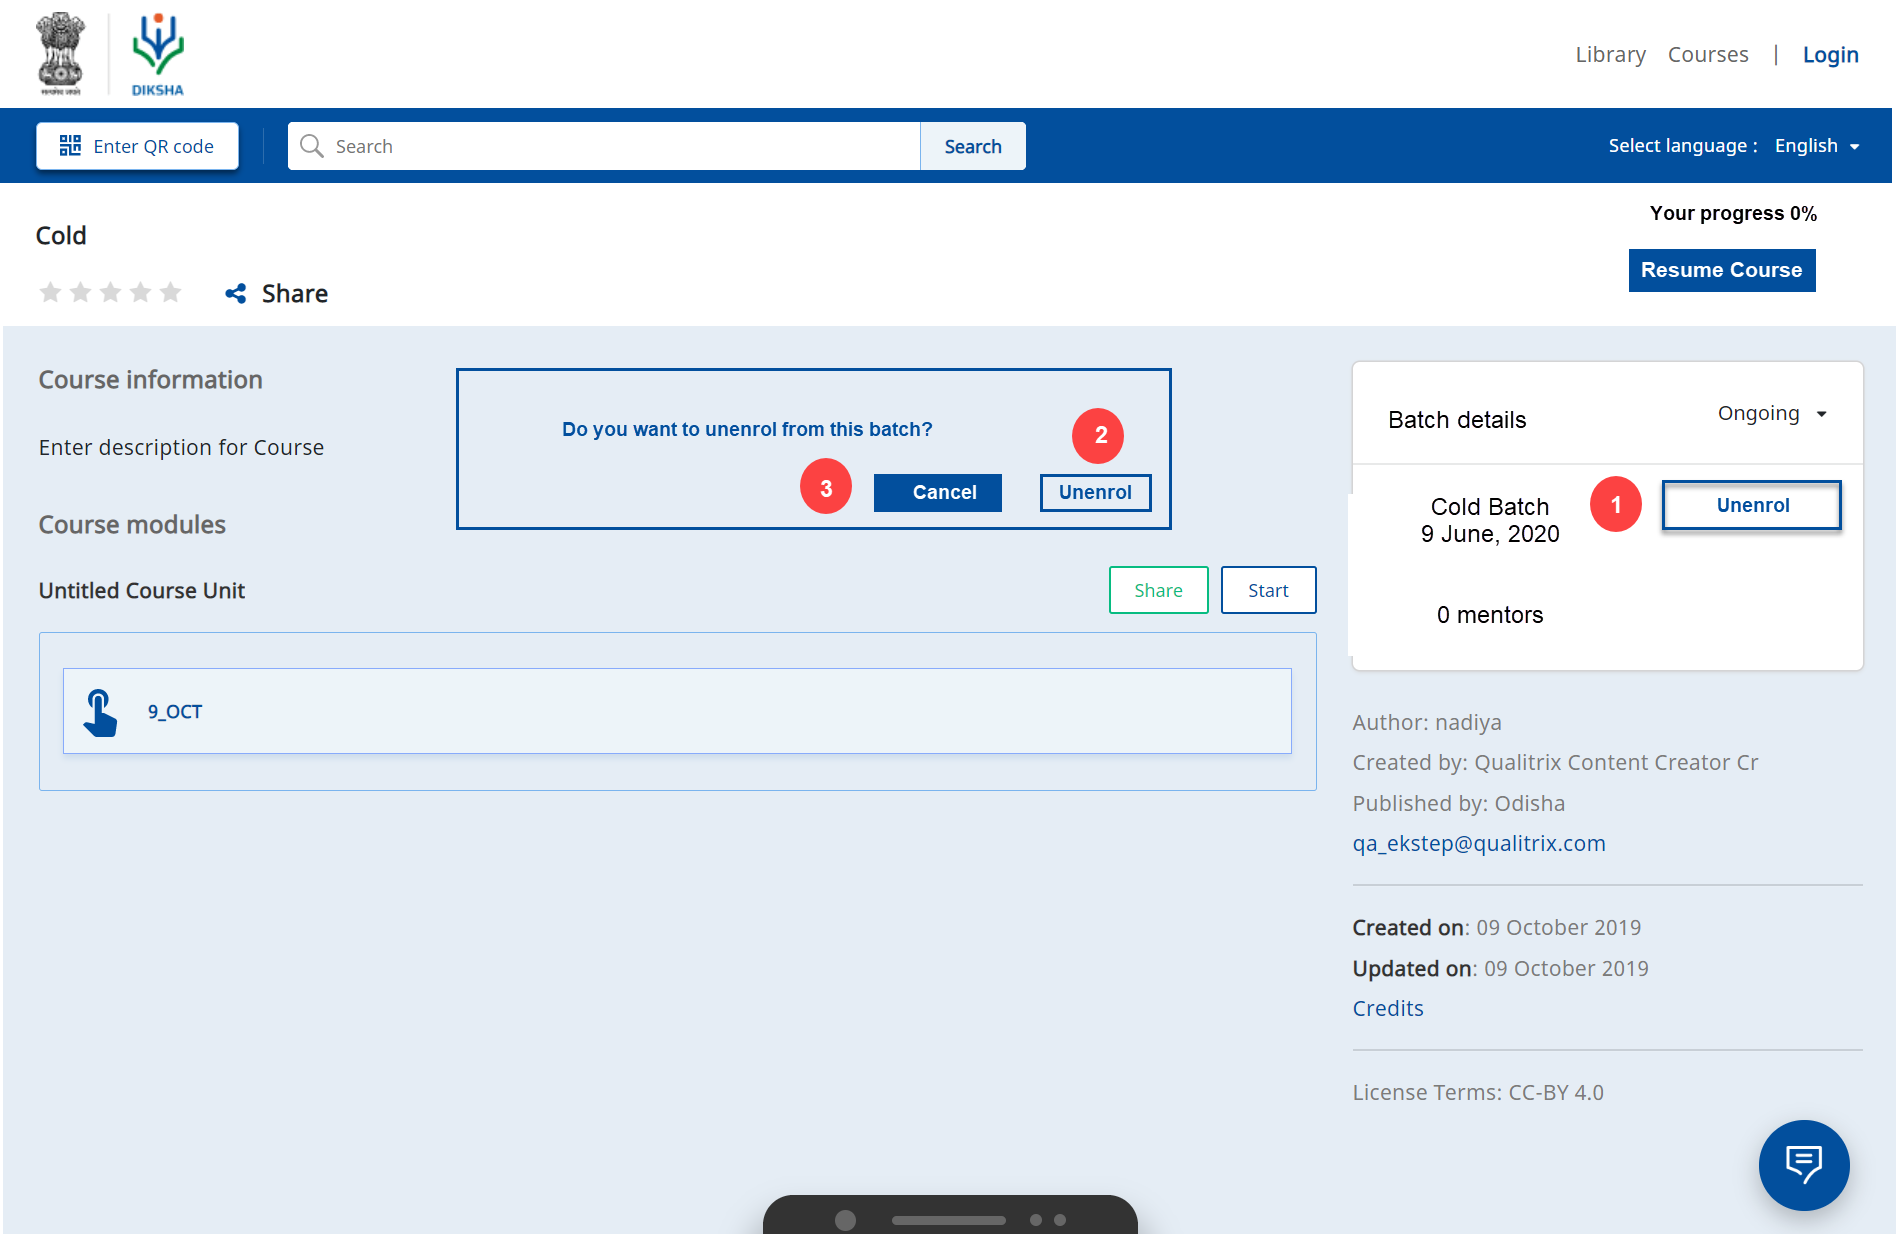
|